
How To Cut Files
Easy To Do Guide
With my sole concentration being on file sales and KS projects and with more and more of you guys buying printers the need to be able to cut files is becoming a need to know exercise, but rather than thinking its a daunting task this guide will show you its so easy that you will wonder what the fuss was about.
Why do i need to cut files you ask?
well the easy answer is scaling, the files allow you to print in whatever scale you choose but with that brings the issue of whether it fits your bed size, cutting not only allows you to do this it also allows you to cut to your maximum bed size, i do offer a cut set in all my KS files but i can only do one set and i have to make them quite small so 190x190 is how i cut them, but most of us have a lot bigger print beds so cutting them to suit allows less joins and in some cases whole uncut prints.
so with all the above said and hopefully agreed the following is the simple way i cut mine, really guys its easy to do. also i must quickly add that there might ne easier and quicker ways but if you know that you dont need to read any more, this is for those that haven't done so yet and is just my way.
Flashprint cutting
ok flashforge have their software program called flashprint, this is a free download and loads up my files and saves them in stl format so you can use any of my files with this program and i find it really simple to use, it also offers a repair option that can solve some silly minor issues, i will put a flashprint file for free in my shop but i might get told to remove it so until i do it will be available there, i do own two flashforge printers so its not like i shouldn't have it
so basically what i do is load the stl file on (you can just list you are using any printer its fine if it doesn't fit in the bed square, there is a nice option then in the rotate menu that allows you to click any surface and it puts it flat on the bed, you can look underneath then to make sure its all flat.
the cut option you can load on multiple models and cut one or all or just the selected ones along the three axis or even draw a line using your mouse, when cutting you can choose to keep them in place or it separates them and moves each piece, after cutting just delete the piece you don't want repair the other and save job done, really easy to do and use and most importantly is free, there are some screenshots below to show it, if you need any more info just comment here.
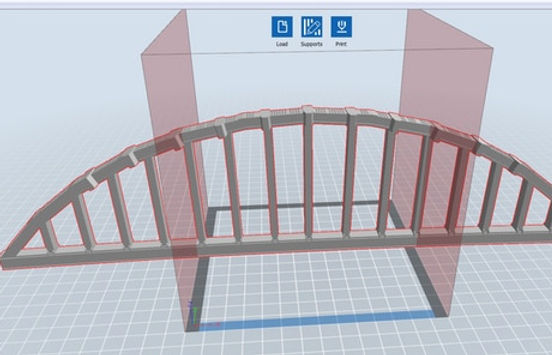
for example the arch for arnhem here is how i sliced it into 4 pieces per side, like i say ignore the bed box

as you can see you can select the model to rotate 90 at a time or do it by mouse or tick the surface to platform box and double click any surface, we are going to cut this right down the middle end to end to start and keep the model in place so as we will want it that way for the next cuts

when you have chosen you axis a big red circle appears this can be moved with the mouse or by typing in distance manually, this cut only affects the model chosen even if it overlaps another model if you have multiple stls loaded, i have ticked keep in place

so i now cut it, i then choose select all from the top menu and then again cut right down the middle of the x axis too, so i have it now looking the same but its in fact four different pieces, there are red lines to show the cut lines

ok we can now click on each piece and manually move them apart, before that though just use select all from the menu and then repair from the menu to make sure they are ok
